Alfred Maley
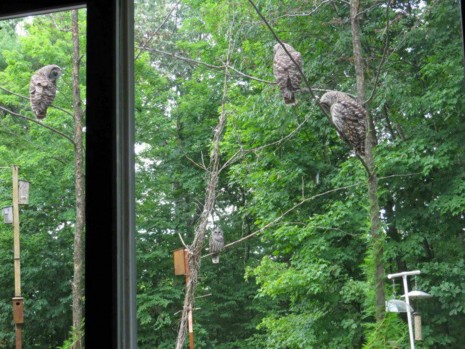
Gang of Four (Ralph, Alice, “Norton,” and Thelma). The young Barred Owls from the nest in the yard stopped by for a group shot before heading off on their summer vacation. Photograph taken through the slider by Alfred Maley.
In my previous articles on Barred Owl nest box construction (Maley 2010, 2015), I glossed over the placement of the box in a tree and providing protection from raccoons. This note describes a simple, safe way to get a box up in a tree and a relatively simple, easy-to-maintain flashing system to keep raccoons from taking over the nest box.
The problem of attaching the box to a tree is discussed in the previous articles, and two methods of doing so are described therein. Regardless of the method used, it is critical to have both hands free to perform this task. That means that, in addition to a safety belt that secures you to the tree, you will need a way to raise the box and secure it in position while you attach it.
Raising the Box Into Position
A scheme that is simple and works well is to attach a piece of light, 3/16 inch Grade 30 chain snugly around the tree above where the box will be, with a pulley attached to the chain over the box location. A rope is used then to hoist the box into position. First a piece of 16-gauge tie wire is attached to the box—through the eye bolts if used—and connected above the box to make a place to secure the rope. Wire will not interfere with connecting a chain to the box, as would happen using the rope itself. Imagine a wire clothes hanger, with the horizontal part through the eye bolts and the rope attached to the apex.
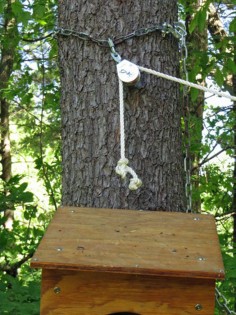
Close-up of chain-pulley-rope mount.
A 50-foot piece of 3/8 inch twisted nylon rope is usually sufficient. It must match the size of the pulley, so get a two-inch pulley that will accommodate that rope size. A 1/4 inch Quick Link will secure the pulley to the chain. To secure the chain around the tree, first attach a 1/4 inch clevis grab hook to one end of the chain. Then you can pull the chain snug around the tree and clip the grab hook over a chain link. The weight of the box will pull the chain tight on all but a greased flagpole.
After inserting the rope through the pulley, put a knot in each end of the rope. It is very easy for the weight of the rope to pull it out of the pulley at an awkward moment, causing delay and extra steps.
An assistant on the ground is helpful to pull the box up into the tree and hold it there while you attach the box. Alternatively you can raise the box yourself from the ground, secure the rope, and then proceed to ascend the ladder and attach the box.
In no case should the assistant—or anyone else—stand below the box. All parties should be well to the side in case something goes wrong.
Once the box is attached, the wire can be cut with wire cutters and the wire, chain, and pulley removed.
Note that this method may also be used to remove a box, should you need to.
Flashing to Keep Raccoons Out
Aluminum flashing is useful to keep raccoons from climbing the nest box tree. But trees grow, so some way must be found to adapt the flashing to the growing diameter of the tree. After much trial and lots of error, I have found a way that works well and does minimal or no damage to the tree. It consists of joining two pieces of flashing together, then fastening them to a slim piece of wood that you secure lightly to the tree bark with two screws. The flashing is then wrapped loosely around the tree and the end is attached to the piece of wood. See the photo.
Aluminum flashing can readily be found in widths of 16 to 20 inches at building supply stores, but that’s a little narrow for a determined raccoon. I join two pieces together with an inexpensive pop rivet tool. It’s worth getting; you’ll find lots of thing to rivet together.
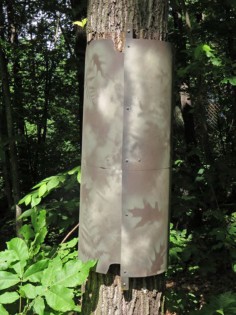
Close-up of flashing around tree trunk.
Start by measuring the circumference of the tree at chest height. Add two feet to the measurement and cut two pieces of flashing to that length. I like to have 30–36 inches of flashing, so overlap the two pieces to obtain a width in that range. Use pieces of duct tape to secure the pieces together so that the rivets get placed and inserted smoothly. Use rivets with a grip range of 1/16 to 1/8 inch. I use 1/8 inch oversize-head, aluminum blind rivets, trade size 42; see www.BoltDepot.com for a lucid discussion of blind rivets. After drilling each hole through the overlapped pieces at intervals of about one foot, insert a rivet. Place the first rivet a few inches from the end so that it will not fall on top of the piece of wood you are attaching the flashing to. After all the rivets are in place, remove the duct tape.
The best source of wood to attach the flashing to seems to be square pressure-treated deck balusters, obtainable cheaply at lumberyards. These balusters are the same as used in the nest box construction. I use 42-inch-long pieces, which leaves several inches at the top and bottom for the two attachment screws. These pieces are about 1.25 inches square, which is more than is needed. I rip the pieces on a table saw to get a piece that is about 3/4 inch thick.
Next, attach the end of the joined flashing pieces to the baluster with about five stainless steel screws. I use Phillips pan-head sheet metal screws, size #6 x 3/4 inch with a washer. Predrill a hole through the flashing and partway into the baluster to make things easier. Drill two holes in the baluster, one near each end, so that the attachment screws will slide easily through the wood (but not the head of the screw). I use three-inch stainless steel deck screws, but other types would be suitable.
Now is the time to make the flashing nearly invisible with flat camouflage paint. I use Rust-Oleum’s camouflage spray paint. Start by spraying the entire piece either all black, all brown, or a combination of both. After it dries a bit, place leaves, fern branches, hemlock boughs, etc. randomly on the surface. Make sure the items rest flat for the best effect. Then overspray with green and maybe small bits of a lighter color such as khaki.
For a neater application, the tail end of the flashing is going to slip under the head of the flashing, so it needs to be narrower. Start by marking a pencil line two inches from each edge of the last two feet of the tail end of the flashing. These edges will be cut back to where the tail is to go under the head of the flashing once the flashing is in place on the tree.
It is helpful to have an assistant if it is windy when you attach the flashing to the tree. Attach the baluster to the tree lightly with two long screws, penetrating the bark only enough to secure the baluster in place. Wrap the flashing around the tree leaving about two inches of space all the way around and mark where the tail meets the baluster. Cut back the edges from the end of the tail to that mark. Remove all but the top and bottom screws that attach the flashing to the baluster. Slide the tail piece between the head and the baluster, verify the spacing around the trunk and that everything is as straight as possible, then re-insert the screws you removed. They will go in the same holes and will penetrate the tail piece and secure everything in place.
Maintenance consists of backing out the two screws holding the baluster a bit every year or so, and adjusting the tail every few years. That adjustment consists of again removing the middle screws securing the head and tail, pulling the tail out as needed, and then re-inserting the screws.
It is important not to make holes in the bark of a tree and leave them open since carpenter ants will use them to gain access to the heart of the tree and may lead to rot. If I remove flashing, I place a suitable nylon or brass screw in any hole to seal the hole and to be friendly to a future arborist with a chain saw.
Nesting Results for 2016
Barred Owls successfully occupied seven nest boxes in Hampstead, New Hampshire, this year. One pair continued to nest in our suburban yard and fledged four young. They graced the backyard from mid-May through mid-July, before setting off to learn to hunt in the larger neighborhood.
References
- Maley, A. 2010. Low-Maintenance Barred Owl Nest Boxes. Bird Observer 38: 151–155.
- Maley, A. 2015. Barred Owl Adventures in Hampstead. Bird Observer 43: 294–298.
Alfred Maley is a retired software engineer whose interest in nest boxes began at age 10, when he cobbled together a successful bluebird house with wood from an orange crate. Later came Barn Owl nest boxes and Long-eared Owl nest baskets. When they are not watching raptor migration in Spain or traveling with Danger Tours to Latin America, he and his wife Linda reside in Hampstead, New Hampshire. Readers with questions can contact him by email at: alfredmaley@gmail.com.